A Clean, Multipurpose Agency Theme
FMP- Creating a composite
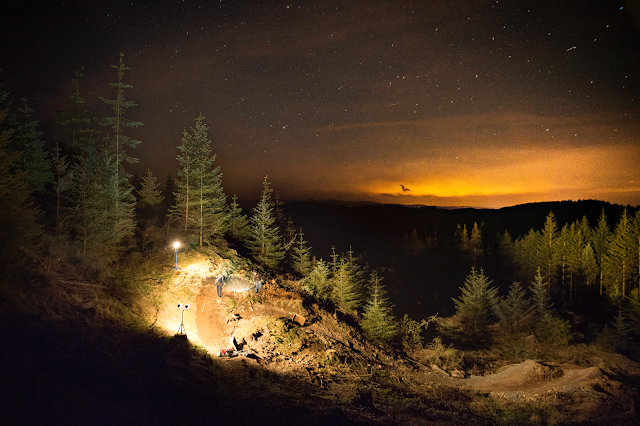
During the night dig I wanted to capture the atmosphere of the dig, working under halogen lighting in the middle of the woods gave a absence and showed the commitment of the progressive liens crew.
I collected a variety of shots altering the exposures to allow me to capture the workers and their halogen lights as well the natural light of the stars.
With a little understanding of how far I can push the exposures in post I chose my exposure to try and keep the quality up. I intentionally selected fast shutter speeds for the the darker shots of the activity to get sharp detailed images. I found the halogen lighting was causing a lens flair that appeared in the sky so in the 4 exposure I block the light with my hand making sure not to cover any of the sky.
I used four of these exposures to make my composite;
- The trees around the track
- The stars and distant trees, I included these trees are the gave the image distance and added interest away form the build
- Is the action shot, While this wasn't the best of all the action shots I had pushed my ISO to 5000 in the other shots so went with this as its at a saver 40000
- I used a small patch of this shot the brighten the gap between the lights in 3 and the trees in.
I had produced a quick test composite after the shoot to see if the images would blend together seamlessly, while this achieve the look I wanted the quality needed to be sorted. The noise in the sky is very strong and the blending of the trees and sky is very noticeable.
As I now knew these pictures would blend together I went back to Lightroom and edited them with the mindset of matching exposures, colours and tones. I reduced the exposure of the stars and applied some noise reduction to give a cleaner image. after opening them in Photoshop I aligned the images Starting with the sky I applied a layer mask brushing in the areas I wanted to keep in the image. I paid close attention to the stars as they moved between exposures I made sure I masked duplicate stars off where 2 images were blending together.
I used adjustment layers to tweak individual layers helping the image appear as a whole.
I achieved a much cleaner image paying attention to the stacking and blending on the image. I decided to lighten the bottom left to lead you in to the image, and kept the colours bold intentionally to aid in the printing as its a fairly dark image.
Subscribe to:
Comments (Atom)
Popular Posts
-
This weekend I went camping in the lake district, getting away form civilisation and distractions allows you to slow down and observe what i...
-
Hollywood promotional portraits where used to created interest in a actor or actress during the golden age of Hollywood. The characteri...
-
My friends play in the local basketball team the Kendal Warriors, While I was up in the Lakes they had a match vs Newcastle Univercity which...
-
I was asked to remove the lens flair from this image as they wanted to print it fairly large. so theres a few things to things bout wh...
-
Birmingham airpot I wanted to replicate the motorway time-lapse with aeroplanes I found this location around 10:30 at night just in ...
-
A friend of mine is wanting to sell his bike so I took the opportunity to do a product shoot for his internet adverts. As this bike...
-
I recently had a quick shoot to on the shore of lake Windermere originally the shoot was to demostraight the use of flashguns but the overca...
-
Flashguns can be a scary bit of kit to get to grips with, but with a little bit of knowledge and practice they can be one of the most...
-
With Ryan air offering cheap fairs across Europe it can be cheaper to travel abroad than across the UK. At just £28 for a return flig...
-
This was the first stage of the Scottish downhill series as its a 2 day event it was a good chance for me to practice my biking photograp...
Twitter Updates
Meet The Author
Blog Archive
Get In Touch
Category
- Band
- Basketball
- big day
- biking
- Birmingham
- blea tarn
- Boomerang
- Bootlegers
- building
- camp
- Camping
- Collodion. Old school
- composite
- consell hall
- Dallam
- Darkroom
- Editing
- equipment
- Film
- Film characteristics
- grasmere
- Helvellyn
- Hike
- hoop
- kendal
- krisbentham
- lake district
- Lakes
- lens flair
- Library
- marriage
- nikon
- Old library
- Paradise
- Photo
- Photog
- photograph
- photography
- photoshop
- portrait
- preset
- progressive lines
- Public opinion Black and white
- removal
- spinners
- Stars
- Striding edge
- technique
- tent
- the lake district
- the lion and the lamb
- time-lapse
- timeline
- trail
- tripod
- uk
- Vox POP
- Walking
- warriors
- Wedding
- wedding photographer
- wedding photography
- Wet Plate
- wild camp


