A Clean, Multipurpose Agency Theme


Boomerang
I hand the opportunity to capture some promotional images for the newly formed band Boomerang based in the Lakes the band preforms at events and pubs so i wanted to create images for the band that would show them as bing at home at a wedding as much as in a bar.
While Bootlegger the venue offered the rustic pub feeling They also had a full lighting set which allowed me to give the band a cleaner brighter look than fits in with a wedding while keeping the a edgier pub look.
I wanted to get a broad image of the band so I looked to get some close up detailed images of the equipment, The colour of the stage lighting and use of a wide aperture has created some nice interest with in the images.


With the stage lighting changing with the music it was a challenge to shoot quickly while keeping the quality as high as possible, the Red lighting was patchily strong and would blow out images. While shooting the band I looked to get a minute of wide group shots and individual portraits. the group shots had the challenge of getting every one in with a good perspective.


Overall it was a very enjoyable shoot and the band sounded great, I look forward to seeing more of them when you start gigging in February.


Applying presets to portraits
I recently had a quick shoot to on the shore of lake Windermere originally the shoot was to demostraight the use of flashguns but the overcast day was giving such a soft ambient light I decided to take advantage of that. I used a ND filter to allow a very narrow DOF I wanted to have the background out of focus yet keep the detail within the subject.
I wanted to edit these images in a way I have not tried before, by using the preset to add to the subject matter, this is a method I have noticed a lot of photographers I follow on photoshop use. A lot of the preset are actually designed to replicate old film styles, this method of editing could be seen as a throw back to how photographer selected film for a shoot just applied after the shoot not before
I wanted to keep the style of my subject while showing off the environment he was in, to do this I started with shooting with a narrow DOF this would lead the eye to the subject emphasising the detail within his beard and clothing. To emphasis this while editing I was looking of a preset to show the most detail with the blacks and shadows. as well as bumping up the clarity.
To show off the environment I wanted the tones to reflect the area and the day, the wasted out tones give its a classic with the dull highlights reflecting the overcast feeling of the day. I also cropped some images to focus on details of the environment, buy removing the subjects face it requires you to look else where in this case you notice the rhythmic waves juxtaposed with the liner wood pier.

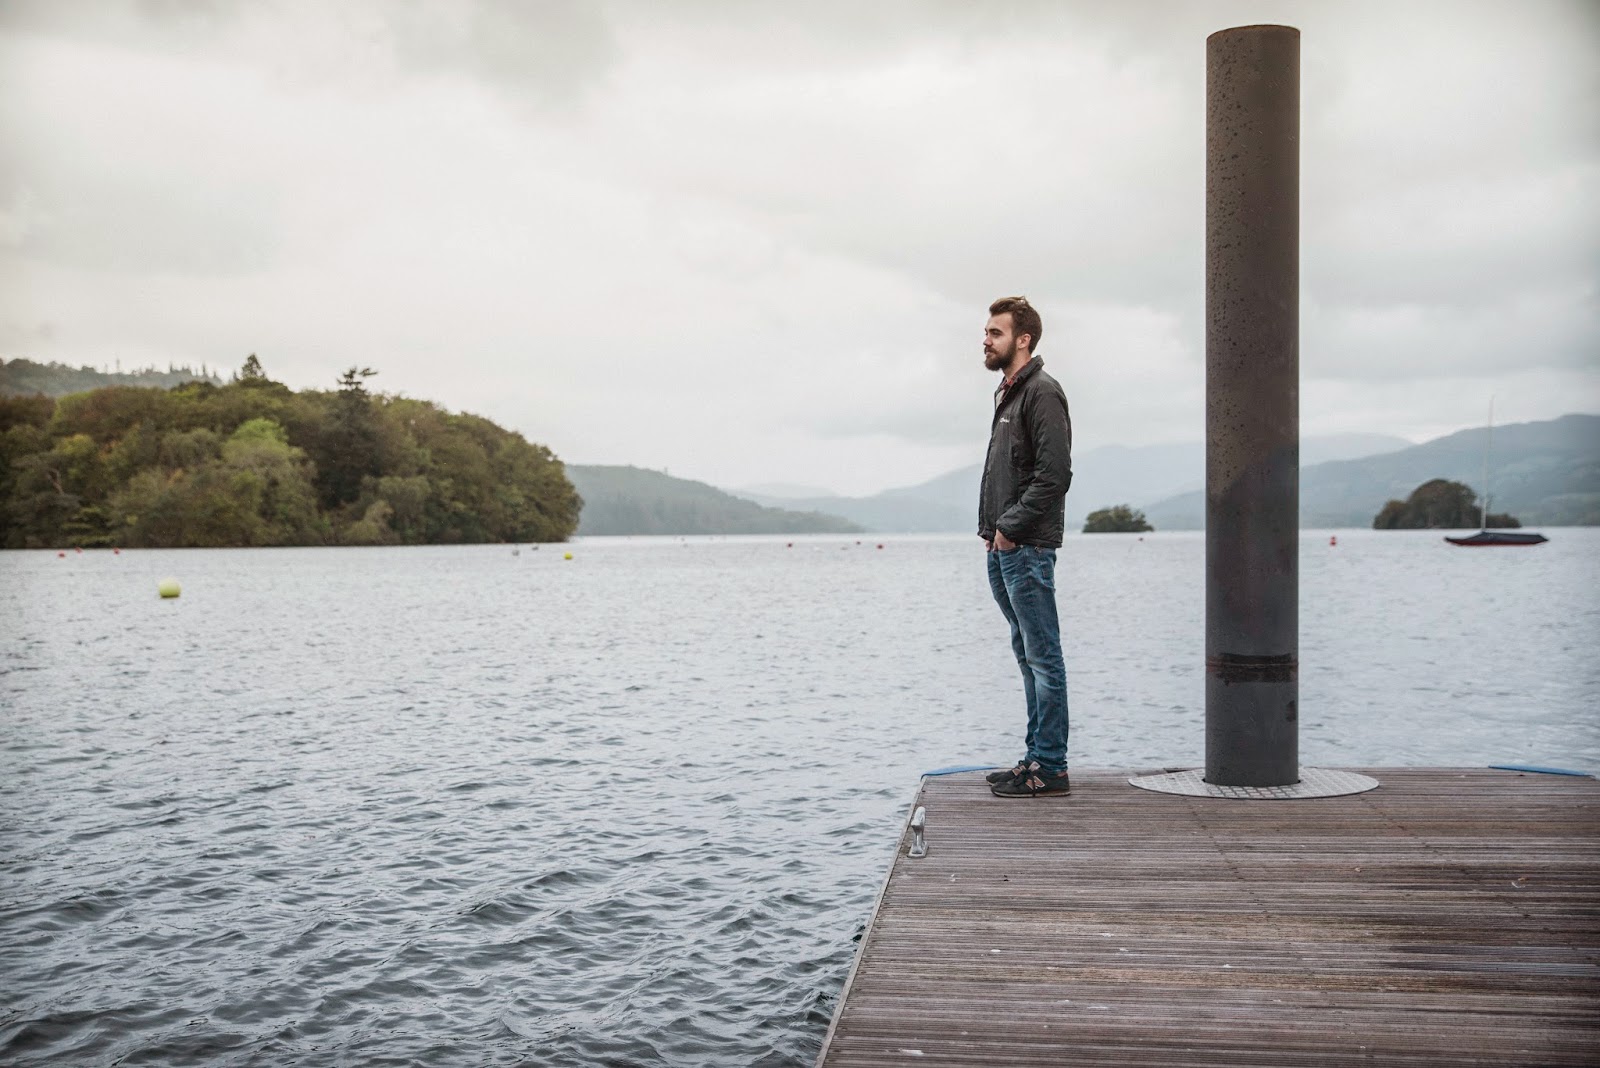


The preset that I used for these Images is onOne Grunge with grain and Dark Edges, I did alter the tones to make them work with the images as well as remove the dark edge. I like the feel of these images but in exporting it has shifted the colours slightly and its not due to the colour profiles. This series has a very editorial feel and look and its a strong way to ensure the Images have a constant look. I will be researching into old film characteristics as this is a powerful tool to add meaning to an image be it to guide the viewer to a feeling or just to emphasise what is already there.
I wanted to edit these images in a way I have not tried before, by using the preset to add to the subject matter, this is a method I have noticed a lot of photographers I follow on photoshop use. A lot of the preset are actually designed to replicate old film styles, this method of editing could be seen as a throw back to how photographer selected film for a shoot just applied after the shoot not before
I wanted to keep the style of my subject while showing off the environment he was in, to do this I started with shooting with a narrow DOF this would lead the eye to the subject emphasising the detail within his beard and clothing. To emphasis this while editing I was looking of a preset to show the most detail with the blacks and shadows. as well as bumping up the clarity.
To show off the environment I wanted the tones to reflect the area and the day, the wasted out tones give its a classic with the dull highlights reflecting the overcast feeling of the day. I also cropped some images to focus on details of the environment, buy removing the subjects face it requires you to look else where in this case you notice the rhythmic waves juxtaposed with the liner wood pier.
The preset that I used for these Images is onOne Grunge with grain and Dark Edges, I did alter the tones to make them work with the images as well as remove the dark edge. I like the feel of these images but in exporting it has shifted the colours slightly and its not due to the colour profiles. This series has a very editorial feel and look and its a strong way to ensure the Images have a constant look. I will be researching into old film characteristics as this is a powerful tool to add meaning to an image be it to guide the viewer to a feeling or just to emphasise what is already there.

Wild camping in the lake district -Blea Tarn Time-lapse
This weekend I went camping in the lake district, getting away form civilisation and distractions allows you to slow down and observe what is happening in front of you. While its a perfect from a photography point of view its important to be prepare for what you are getting in too.
We know the weather wasn't going to be idea although not bad enough to call it off (after all 'bad' weather can give you more character to your images) so we decided to have a relatively short route.

Parking by Thirlmere and walking roughly 2 hours to Blea tarn, this took a bit longer due to the bridal way being resembling a stream, making the rocks slippy an the grass boggy.
Just like a photography shoot, its important to have the right camping gear


I then used photoshops image processor to apply the process to all 562 images, This is a great time saver but you need to design you action to work independently, its also still quite time consuming, it seamed to go fast when i put the monitor to sleep presumably it didn't have to display the processes it was going thought so speed the process up.


The plan
We know the weather wasn't going to be idea although not bad enough to call it off (after all 'bad' weather can give you more character to your images) so we decided to have a relatively short route.
Parking by Thirlmere and walking roughly 2 hours to Blea tarn, this took a bit longer due to the bridal way being resembling a stream, making the rocks slippy an the grass boggy.
The gear
Just like a photography shoot, its important to have the right camping gear
When selecting clothing I like to take layers, a base such as a t-shirt and hoody to keep you warm thought the day then a downs jacket for the night this way you can add and remove layers token comfortable. I have a waterproof jacket for when its wet, I would recommend one with a breathable membrane such as event or gore tex this allow you jacket to let moisture out such as sweat while keeping water out.
A good pair of socks and walking boots help stop blisters and wet feet, agin getting gore tex options helps keep you comfortable.
Accommodation for the night was originally going to be just a sleeping bag and bivi (waterproof cover for the sleeping bag) but due to the harsh weather i took the water proof shell as a bit of extra shelter, i chose to leave the inner fly net and ground sheets to save weight. a sleeping mate is also very important as i found on a previous trip where i didn't have one, with out the insulation of the mat your heat is absorbed to the ground leaving you very cold.
My camera gear now lives in the Dakine sequence bag, this is ideal for me as it has a inner camera block and outer rucksack. This keeps my gear very save when using them together or I can rip the camera block out and my gears nicely packed for the hike.
I would like to get a dry bag for the photo block just to give me piece of mind my gear isn't going to get wet.
For this trip I took all my gear as i know it was going to be a relatively short hike, If i had to carry cooking equipment or extra layer i would consider reducing the equipment.
The outcome
the gear worked out perfect for the trip, which was cold and wet but by taking the shelter it allowed me to keep dry and air things out when thy got wet it also gave me somewhere to keep my gear which would have been very wet had I just used the bivi. The location we planned to camp in was very boggy but we managed to find a dry-ish patch in a wind brake, the only downside being it was on a slope so i found my self slowly sliding out of the tent.
The sky was very dramatic with a thick cloud being swept along with the song winds, this was good for us it gave us a interesting sunset with deep red accents on the clouds and the skies kept opening to show us the stars above.
The photography sunset
Just after setting up camp and getting a brew on I noticed the sunset was catching on the clouds giving a deep red tone to some of the clouds.
I wanted to make this in to a time-lapse the changing of the colour would give it an unique interest, it took me a few minuet to set up the camera. by the time I had set up the camera the colour had gone. The image below was taken 2minuets 40seconds after the first yet all the colours have gone
When I got the image in to Lightroom i batch processed the image, altering the tones and colours, i also removed a fair amount of marks from from dirt on the lens as I hadn't had chance to clean the image. This syncing of the spot removal did not work as it just copies the position of the brush and its reference point on to each image rather than copying the brush and intelligently moving the reference point. This became apparent when I rendered the files on to a time-lapse.
To rectify this I have created a action with in Photoshop to apply to all the JPGs. First i created a selection of all the dusk points and saved it. then i turned on the action recorder and copied the background layer then loaded the selection and applied it to a layer mask. next I applied a dust and noise filter to the copied layer. This smoothed all of the dust particles of and is specfic to each frame as its created form that frame.
I then used photoshops image processor to apply the process to all 562 images, This is a great time saver but you need to design you action to work independently, its also still quite time consuming, it seamed to go fast when i put the monitor to sleep presumably it didn't have to display the processes it was going thought so speed the process up.
once all the files where complete I then loaded them as a sequence in photoshop, this allows you to create the time-lapse with out having to load all the images into the program stopping you using any unnecessary processing power.
The photography night
After the sunset we concentrated on keeping warm and dry having a brew and cooking the sausage tea, I warmed up when we started to think about photography and not how miserable the weather was. the first think i notices was how the clouds where catching the light pollution of Keswick form behind the i wanted to try this as a time-lapse but due to me only taking a 32GB file and half filling it creating the first time-lapse I decided to use the D610s Time-lapse function. This compiles all the images as it goes creating a mov file thats actually smaller that one NEF file.
By shooting in the Timelapse mode I don't have the same quality as with the other method I have used. Because of the tungsten glow hitting the clouds the colour of the stars and space is slightly green, this is something i could alter if i had all the frames.
The final shot we took form the night was of of the tents, I had noticed the stars peaking out behind the clouds so decided to try the classic illuminated tent shot. we places our toruches in the tents and tried to get a even light form both the tents. then we tool the images exposing for the stars.
The image has come out well, The wind was quite fast and i think this has resulted in a softer image, the tents where moving. The stars would have been brighter but the clouds where moving with the wind, we where lucky to get such big gap.
Over all I'm quite happy with the images i got on this trip considering the harsh weather we went in. I will consider going out in such weather again as i think it gives a unique look to the images you just need to be ready for the unexpected.

Lens flair removal
I was asked to remove the lens flair from this image as they wanted to print it fairly large.


This has left me an area with no colour. To add colour I added a selective colour adjustment layer, this allowed me to add colour to the nuetral tones while keeping the structural detail in the whites and blacks.


The process worked well, has the flair covered the bike it would have been an near impossible task to remove due to the detail be lost not being easily duplicated.
so theres a few things to things bout when removing the flair;
- removing the green tone
- applying to texture where the flair has 'blown out'
- adding realistic tones
- blending the contrast as the flair would give very soft detail.
I started with the image in photoshop, duplicating the layer as a way to preserve the original file i then used a hue and adjustment layer to remove the green tones.
The selective colour adjustment layer works with he CMYK colour principle so form the research I did for the 3 layer effect understanding the relationship between these allowed me to quickly select the right tone to blend in with the trail. To help the tones blend i applied it to areas not effected by the flair as well as the colourless patch.
Now i need to deal with the loss of detail due to the blowing out caused by the flair i used the clone stamp to add some more grass around the bike tire, I then used a combination of burning, dodging, curves and contrast adjustment layers to blend the tones below the bikes bottom bracket
I then saved the file and brought it in to Lightroom where I cleaned the images up removing some more of the green tone on the bike and adding clarity to the rock as well as some cloning.
The process worked well, has the flair covered the bike it would have been an near impossible task to remove due to the detail be lost not being easily duplicated.
 |
| sRGB |
 |
| Adobe RGB |
Colour Profiles
Im very pleased with the outcome of the image it has a realistic look and tone.
I originally exported the file as Adobe RGB as that the colour profile I use, this resulted is the colours looking a little washed out, tones are slightly off and the shadows are brighter than the original. By keeping the colour profile sRGB as the image was shot I have kept the deep shadows and vibrant orange of the sunset
I originally exported the file as Adobe RGB as that the colour profile I use, this resulted is the colours looking a little washed out, tones are slightly off and the shadows are brighter than the original. By keeping the colour profile sRGB as the image was shot I have kept the deep shadows and vibrant orange of the sunset
original image by Andrew Meth-cohn

Kendal Warriors Vs Newcastle University
My friends play in the local basketball team the Kendal Warriors, While I was up in the Lakes they had a match vs Newcastle Univercity which i decided to go shoot.


The fixture was at the new sprots hall at Dallam school, this gave me fairly good lighting for the game, this allowed me to shoot at a lower ISO than I have use in other sports halls keeping the image quality. The shutter speed was kept quick due to the action, this required me to use a wide aperture.
For the shoot I use my D610 with the 70-200 ƒ2.8 lens shooting at ISO 2500, 1/340 -1/500 and ƒ2.8. I set the white balance to auto due to the mixture of natural and artificial light.
I used 3d focus tracking, this is a continuous focus tracking system that actually predicts the motion of the subject to stop loosing focus in the split seconds the camera opens the shutter. This is the first time I have used focus system and it worked great giving me constant sharp images.

Workflow
As a photographer time is money, developing systems to cut down your amount of work is vital to become a profitable photographer and freeing up time.

over the past few years I have developed a work methods to make myself more productive, although these is a big improvement over how i worked when i first started there are areas i could improve and develop.
Heres my current workflow:
1. Lease with client to create a plan, preparation before the shoot can save time in the post. discuss what they want and research any techniques or circumstances your not familiar with. proper set up of the shoot can result in hours saved in post or the possibility of a reshoot
2. During the shoot I will evaluate the images as I go, I will delete images in camera this frees up disc space as well as time when filtering the images later. I use the dual card slot on the d610 shooting on to 2 SD cards give me pice of mind that i have a backup copy of the images should one of the SD cards fail.
2. During the shoot I will evaluate the images as I go, I will delete images in camera this frees up disc space as well as time when filtering the images later. I use the dual card slot on the d610 shooting on to 2 SD cards give me pice of mind that i have a backup copy of the images should one of the SD cards fail.
3. After the shoot I will upload the images in to Lightroom, changes the files form nikons raw format to DNG to allow me to open the files with more programs. during this process I always rename the images giving them a name more relevant to the job/image.
4. I then filter the images using the Lightroom pick feature this allows me to quickly evaluate which images I want to use.
5. once the images are selected I move to the develop module and apply edits using the adjustment sliders, presents and sync buttons. I try to keep apple the same editing techniques to all the images making them look like they belong together. any complex editing i take to photoshop and then bring the edited file back in to Lightroom to keep them together.
6. Once I am happy with the edit s i look thought them before I export them, changing them to jpg.
Areas that I could improve on my work flow would be:
Working on my camera techniques would allow me to get more sharp well composed images resulting in less images to filter. I have been working on my focusing and playing with the different settings as well as using the cameras beep to know when its in focus.
File structure by using Lightroom I have become lazy letting it structure my files, recently i have started renaming the files and changing there location but this could have more structure making me more organised.

Flash guns on location

During our recent trip to Brighton Biennial we took the opportunity to demonstrate the use of flash guns on location.
I wanted to use the flash to separate the background and subject so I had a 1.2 ND filter to allow me to open the aperture while keeping the shutter speed inline with the sync for the flash gun giving a very large bokeh but sharp subject. I also shot with my lens fully extend to 70mm to use the compression of the lens to add to this effect. this did mean i needed more power from my flash gun as i was further away.
 |
| ISO 100 70mm ƒ5 1/100s flash fired |
 |
| ISO 100 70mm ƒ5 1/100s flash did not fire |
The same effect could be achieve with a reflector and assistant, as this was a very cloudy day there was a very soft light so the fill light isn't as important as it would be on a sunny harshly lit day.
I wanted to be more creative with the flash gun to really show its potential so decided to use it off flash. there are various methods and accessories to this but used Nikons commander mode which allows you to alter the settings of the flash remotely with in the camera. this is very handy as you don't need to more about and can add subtle adjustments.


to find the Commander mode you need to go Bracketing/Flash > Flash control for built-in flash > Commander mode. For here you have control over the the built in flash and 2 slave units. You can set the flashes to TTL or manual, there are 3 separate channels meaning that you can use the feature in one channel while other photographers work in another with out interference.

on the flash gun set the flash to Slave mode and and set the group and channel.
on location I placed the flash gun on a tripod left to the camera, I tried to keep the look realistic looking so had it positioned it hight. off camera flash gives the image more depth and more interest, it also allows you to shoot at lower flash powers requiring less power and recharge time. all images shot at ISO 160 70mm ƒ5 1/100s


The backgrounds on the images could been brighter by using a longer shutter speed, with the use of the flash you can use a longer shutter speed as the flash will freeze the motion.
Off camera flash is something I want to play with more to get to know how and when to use it. it can seam scary at first but it is very systematic and once you get a feel for your gear it becomes second nature
Subscribe to:
Posts (Atom)
Popular Posts
-
 With Ryan air offering cheap fairs across Europe it can be cheaper to travel abroad than across the UK. At just £28 for a return flig...
 -
RBG contact sheet I have selected my best 9 images, in my selection it tried to get a good variety but keep a predominate blue tone ...
-
This weekend I went camping in the lake district, getting away form civilisation and distractions allows you to slow down and observe what i...
-
My friends play in the local basketball team the Kendal Warriors, While I was up in the Lakes they had a match vs Newcastle Univercity which...
-
 Today we where given the task to follow a brief similar to that a art director might set; to collect sample images that correspond to their ...
 -
 With the New library taking over from the Old library in 2013, the Old library has begun a 10 year development plan designed to alter the...
 -
 Its possible to create colour images form black and white film by using RGB filters and creating 3 images, this gives you 3 tonally differen...
 -
As part of my assignment I planed a product shoot and use the 5X4 camera. I choose to use a Rolson multi-screwdriver as my product, I used p...
-
 To help work off our festive lunches we decided to camp out on the Lion and the Lamb near Grasmere. With a late start and poor visibility (...
 -
 I designed this camera capture every bit of light with in the pin hole, essentially giving the image a feeling of depth I had previ...

Twitter Updates
Meet The Author
Blog Archive
Get In Touch
Category
- Band
- Basketball
- big day
- biking
- Birmingham
- blea tarn
- Boomerang
- Bootlegers
- building
- camp
- Camping
- Collodion. Old school
- composite
- consell hall
- Dallam
- Darkroom
- Editing
- equipment
- Film
- Film characteristics
- grasmere
- Helvellyn
- Hike
- hoop
- kendal
- krisbentham
- lake district
- Lakes
- lens flair
- Library
- marriage
- nikon
- Old library
- Paradise
- Photo
- Photog
- photograph
- photography
- photoshop
- portrait
- preset
- progressive lines
- Public opinion Black and white
- removal
- spinners
- Stars
- Striding edge
- technique
- tent
- the lake district
- the lion and the lamb
- time-lapse
- timeline
- trail
- tripod
- uk
- Vox POP
- Walking
- warriors
- Wedding
- wedding photographer
- wedding photography
- Wet Plate
- wild camp